Tuesday, October 25, 2022

Apples - Fall - Pie


Are you all in for Fall?  Perhaps a trip to your local orchard for apples, pumpkins, squash and cider?

I made a stop at Arends Orchards, Route 78, Laura, Illinois.  Most orchard "pie" apples are good but Arends is my favorite.  Plus, the cider is straight from the apples - no processing, preservatives or added sugar.  

This morning I decided to make an apple pie.  In the last few years, I've been using my 9-inch ceramic quiche baking dish instead of a traditional pie plate.  It holds more filling and less chance for it to run over while baking.  

Here's the recipe I used this morning from the 1965 Farm Journal's "Complete Pie Cookbook".

APPLE-CHEESE PIE

One two-crust pie - Preheat oven 400 F degrees                                    

INGREDIENTS:

Pastry for a 2-crust pie (either homemade or bought)

5+ cups     Apples (tart) - sliced, cored and peeled  (have a heaping amount in pie)

1 small      Lemon

1/2 C        Brown sugar

1/2 C        Sugar

1/3 C        Flour

1/8 tsp      Salt

1 tsp         Apple pie spice

1 T            Butter

1 1/2 C     Sharp Cheddar Cheese - grated (don't use pre-grated) 

1               Egg White - lightly whisked

DIRECTIONS:

Position the bottom pie crust into the pan.  Pat into shape of pan.  Flatten out any pleats.  Gently push the edge over the top of the pan edge.

Add 1 T of flour and 2 T of sugar on the bottom crust - evenly spread.   

Zest/grate lemon peel into large bowl.  Juice the lemon into the bowl.

Add apples and toss to cover in juice.  Add brown sugar, the remaining flour, salt, spices and cheese.  Toss to evenly cover applies.  Pour into pie crust.  Arrange to make sure applies are lower around the edges and higher in the middle.  This will help keep it from running over while baking.  Cut small pieces of butter and arrange over the top.

Dampen the bottom pie edge with just a little warm water, patting it on with your fingers.  Evenly lay the top pie crust on top.  Tuck under the top edge under the bottom edge and crimp.  The combination of the water, folding and crimping should seal the edges.  With a sharp knife, cut steam holes.  With a pastry brush, lightly cover the edges and top of the pie crust with egg whites.  Sprinkle lightly with a little white sugar.  Cover the edges with a pie edger or crimped alum. foil.  Remove edger/foil when pie starts to get golden.

Bake on middle rack at 400 degrees for 40 minutes (or until apples are tender and crust is golden brown.)  Cool or serve warm.                      


WHY:

The whole apples/cheese thing is German - hardy farm food.  Traditionally, a big hunk of cheddar cheese was served along side the apple pie.  I rather like it mixed - served warm.  I like to tell myself I'm getting a lot of required nutrients. 

The point of using "pie" apples is they are usually tart (to balance out the sugar) and they are juicy (making a good filling.)

Apple pie has been voted a Farm Bureau favorite as most farm yards have apple trees and most farmers love apple pie for breakfast, lunch, dinner and an afternoon snack.   This particular cookbook has 23 different apple pie recipes.      

Both the finished pie or just the pie filling may be frozen.

The good news about pie recipes, is make it once and feel free to tweak it next time.  Too sweet, add less sugar.  Too tart, add less lemon. Don't have quite enough apples, add another fruit.  Too dry, add a bit of milk/cream.  Can't eat a whole pie, make two halves and freeze one.   Have a few pecans in a bag, add to the mix.  No recipe was developed that someone didn't take what they had, what they loved and tried it out.    


Thursday, June 10, 2021

To the Moon Alice!

 If you look closely at gardens created by designers, most have some tall annuals.  They will be single plants or at times in a grouping.  Some in the ground - others in pots.

Because most of us think in terms of annuals no taller than 12-inches, it takes a change in perspective.  Plus, many times these tall annuals are more expensive than a six-pack of marigolds, but, the bang for the buck is BIG.  

Rather than talk on and on about tall annuals, I'll give a few examples:

Sunflowers:   

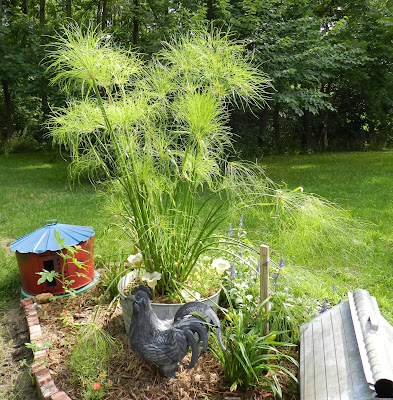
Elephant Feather:


  Elephant Ear:


Banana Tree:


King Tut Grass (tall variety):

Castor Oil Bean:

Canna Lily:


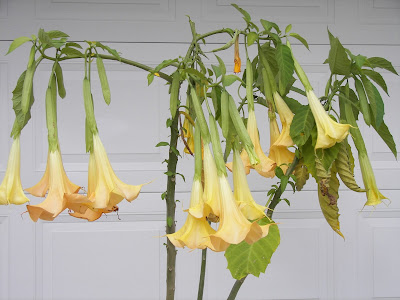
Angel's Trumpet:


Landscapes with tall annuals from the web:


Some, especially the tropicals, may be overwintered inside.  Others, like canna, may be dug, stored and replanted in the spring.  The sunflower gives the added benefit of providing bird seed.  

Try inserting a tall annual in your beds and enjoy taking it to the moon, Alice - or Jane - or Sam or you.   

Friday, May 28, 2021

Asparagus - A Garden Love Affair


 I have a small (ish) patch of asparagus "Purple Passion".  It gives me enough to eat each week from early spring into fall if I keep it picked.

Today I made Asparagus-Custard Pie and it was a resounding success.  

I learned how to prep asparagus from a Jacques Pepin lesson.  When I pick my asparagus, I only take it down to where it crisply pops off, then rinse, shake and peel the stems with a vegetable peeler.  For this recipe, I chopped the stems in 1/4 inch pieces and left the top flowers.


Asparagus-Custard Pie

Line a 9-inch single round cake pan in pie dough.  It can be homemade or pre-made refrigerated type.  Smooth the sides and crimp the edge.  Set in the refrigerator.

4            Eggs - hand whisk lightly

1/3 C    Sugar

1/2 tsp    Salt

1 T        Mrs. Dash Seasoning

1 C        Milk - scalded

1 C        Light cream - scalded

1/2 C    Asparagus - prepared as above 

1 T        Butter

Fry asparagus in butter until tender but not soft or brown.  Mix all seasonings into the eggs.

Whisking continually, slowly add scaled milk/cream into the eggs (you don't want to cook the eggs.)

Spread asparagus evenly on the pie shell.  Gently pour egg mixture over.  Bake in preheated 400 degree oven until a knife inserted 1-inch from edge of pie comes out clean (it was 25 minutes in my oven.)  TIP: Baking too long makes a watery custard.  The center will look soft but it will set as the custard cools.

Cool on rack for 30 minutes.  TIP:  May be served at room temperature or cold from the refrigerator.  If refrigerated, don't cover.  Should be served the same day.

NOTE:  This is not a quiche.  It has the same consistency of traditional custard - smooth and silky.  


This recipe was based on the Country-Kitchen Custard Pie recipe from the Farm Journal Complete Pie Book and modified for my recipe.  Published in 1965, this book is a treasure of wonderful tried and true pie recipes from women who made them every week for their family dinners and dessert for guests.  A farm woman worth her salt always had the Farm Journal magazines and recipe books for a reason.

To digress:  My mother made pie from scratch every week; enough to have pie every meal of every day - including breakfast.  Most were fruit pies for every day.  Company pies were chocolate, lemon, banana, coconut, butterscotch (all with meringue) and custard.  My Grandma Shenk also made an amazing beef mincemeat.  Let's just say pie is in my DNA.   

Back to keeping asparagus picked:  It will quickly go to seed which will often give you more plants.   Keeping it picked keeps it within boundaries and keeps it sending up new shoots.  If it all goes to seed, the plant thinks its yearly cycle is done and will often stop sending up new shoots.  Eventually, in the fall, I let it go to seed to insure I have new plants next year.
Asparagus gone to seed

TIP:  Don't have time to cook fresh-picked asparagus immediately?  Add 1/2-inch of water to a glass and put the fresh asparagus in it and then in the refrigerator.  It will keep another few days.  If vase is not refrigerated, it will continue to mature and will eventually start setting seeds which takes the freshness away.

TIP:  If you don't own a very sharp vegetable peeler, get one today!  Yes, right now!  Caveat: after you finished reading this.   Quality vegetable peelers are not expensive and can be found in most big box stores, kitchen/cook speciality stores or on line.   Throw away that old dull one - yes, do it now!  My current one is an easy to hold, turquoise Kitchen Aid version.  The blades produce a serrated cut.

To peel asparagus:  Hold the asparagus by the flower end.  Run the vegetable peeler down the stem to the cut edge.  Turn the stem to get all sides.  Simple and easy IF you have a sharp peeler.  By peeling the stems, even the more large or tougher stems may be used without worrying if they are too chewy - a lot less waste.

Final TIP of the article:  Scalding milk.   Don't skip this step.  I use a small but deep non-stick heavy saucepan.  After adding milk & cream, set on the smallest burner/lowest flame and turn down to slowly bring to a moment where steam is heavily coming up but it doesn't boil or form a skin.  If it comes to a full boil or burns, you will need to start over so best to keep a watch on this while you're prepping other things.

There are many many asparagus recipes to help you keep harvesting and eating it every week during the summer.  The many choices keep it from being boring.  

And YES, it does make your pee smell funky: "The main culprit is aspargusic acid, which is found exclusively in asparagus. When asparagus is digested, asparagusic acid gets broken down into sulfur containing byproducts. Sulfur, in general, is not very pleasant to smell, notes Dr. Bobart of the Cleveland Clinic. When you pee, the sulfur byproducts evaporate almost immediately, causing you to smell that unpleasant scent".

The benefits of asparagus are pretty darn outstanding:

Just one-half a cup (90 grams) of cooked asparagus contains:

  • Calories: 20
  • Protein: 2.2 grams
  • Fat: 0.2 grams
  • Fiber: 1.8 grams
  • Vitamin C: 12% of the RDI
  • Vitamin A: 18% of the RDI
  • Vitamin K: 57% of the RDI
  • Folate: 34% of the RDI
  • Potassium: 6% of the RDI
  • Phosphorous: 5% of the RDI
  • Vitamin E: 7% of the RDI

Wednesday, February 17, 2021

Making Your Own Bird Suet


The colder the weather here in mid-Illinois, the more the birds in my yard like suet combos.  

Real suet is hunks of solid fat cut from meat during the processing.  I don't use animal rendered fat as it spoils easier and the birds aren't as fond of animal suet.  I use fat such as Crisco which is made from palm or soybean oils.  

 I never put my recipe out in weather above freezing because it will melt and over time it could spoil which will harm wildlife.    

I make a version of the packaged bird suet packages.  I don't have measurements because it all depends on what and how much I have on hand.

I start with Crisco or other similar brand.  Melt in a microwave safe large measuring cup until it is just melted but no need to make it any more hot.

I always add a goodly portion of sunflower seed hearts, old fashioned oatmeal and corn meal.  Not only do the birds love these but it helps hold the concoction together.


Then I add whatever I have on hand - some of those are:

Any uncooked firm grain (not ground flours) such as mullet, kasha, quinoa and etc.  Recipes seldom use all the amount of grains I have so I throw the bits of leftovers in a zip lock bag/put in freezer to use for this purpose.

Jelly/jam/marmalade that I never liked all that much and bits that are too old to still be very tasty.  I don't use any that has hot peppers or hot spices.

Dried fruit (such as cranberries/raisins) and chopped fresh fruit (such as apples.)

A bit of sweets such as sorghum or molasses.   Again, it's usually the bottom of the jar - not enough for a conventional recipe.

Nuts and whole grain cereal.  

NEVER use anything with salt, chemicals, additives or artificial flavoring/sweeteners.  The more pure or natural the ingredients, the better. In our effort to add nourishment to the birds' diets, we don't want to harm or kill them.  Plus, they can be a bit picky even if they're starving.  NEVER use meat or milk products (such as cheese).  Plus, these just attract varmints.  If you wouldn't use in your compost heap, don't put in the suet.     


Why suet concoctions?  The fat helps birds stay warm.  Not only the melted suet but there's fat in most grains, seeds and nuts.  

Once the mixture is combined, I ladle into containers that the mixture will perfectly fit.  Usually, I use the saved bought packaging and freezer containers of the exact size.  Refrigerate until solid.  Extras can be placed in the freezer in zip lock bags to use another day.  Because of the high fat content, they will pop right out.

I have a metal suet feeder that I hang from my plant hanger.  Having it hanging helps keep the squirrels and raccoons from eating it all in one big meal.   Sometimes I hook a container onto a tree.

If you like to feed mammals, then I suggest you put their's in another part of the yard.  If they have their own devoted feeding station, they may leave your bird feeders alone.  Theoretically.  Maybe.  Hopefully. 

 Woodpeckers are the first to catch on there's suet in the area but most of the other birds are right behind them.  


If you enjoy bird watching or promoting their good health during the winter, suet packs are a pretty easy and fast way to up the game. Bon appetit little ones.

Sunday, October 11, 2020

Daylilies, Nature's Bright Treasures

Following is an article I did for a local group on my daylily passion. 


Where your passions lie, there also lies your pictures.  Those of us with grandchildren know how that works.  We can’t resist taking pictures of their every expression, age and event.  AND THEN, showing to anyone who will stand still.  It’s our passion.

Grandma with Cameron, Bradley, Aubrey and Elsie

Grandma with Kaydence, Katherine, Grace, Donny, Kane and Max

Hobbies are another passion as those of us who garden, sew, paint, craft and etc.  We post pictures of every nuance, idea and design.  AND THEN, showing to anyone who will stand still.  It’s our passion, too.


"Chicago Apache"

Hobby passions, especially in the garden, creeps up on us while we’re still too naïve to realize we’re being hooked.  Mine started when I bought the beautiful “Chicago Apache” daylily.  Latin name “Hemerocallis”.  I loved how it behaved so much (the many blooms, the almost no care required, the beauty) that I started buying more at most every nursery I visited.  

After a bit, I found I had most of the ones offered locally.  And then . . . I found on-line daylily stores and as someone said, “Is too much ever enough!!”

"Lilting Belle

I started the documentation of my daylilies after I had ordered the same beautiful “Lilting Belle” three times forgetting that the reason I loved it was the reason I bought it the other times.  It was a “duh” moment and the beginning of taking it to the next level.  To some, that level might be called “crazy daylily lady” but I prefer to think of it as “passionately involved”.

"Mary Todd"
To those who think a plant that has flowers lasting only one day is a waste – oh, no, no, no, my sweet innocent!  The flower is pristine one day and dies.  BUT, and this is a big but (not to be confused as big butt which is a whole other topic) the daylily sends up many stems (called scapes), with many branches and on those many flower buds.  Most plants are covered in flowers for a month or more. The point of having so many plants (besides the whole passion thing) is their bloom habits have them blooming from extra early spring to very late fall. 

"Billy the Kid"
Daylilies have personalities:  singles, doubles, spiders, miniatures, antiques, ruffles, teeth, halos, fragrance and about a zillion more I could go on too long about.  They are in most every color and color combination except true white and true blue.  Both are on the near horizon in hybridizing.  Hybridizers have learned gene manipulation and the results are amazingly beautiful and sometimes amazingly crazy.

"Daringly Different"
The cost of a perennial (meaning it comes back year after year) daylily can be as little as $5 and as much as $500.  Most of the $500 ones are bought by other hybridizers because they have a new genetic makeup they’ll use in their program.  $5 daylilies can be cheaper than the annuals you buy and provide a lifetime of beauty.

"Lacy Doily"
So why do I have maps diagraming where my daylilies are located in my garden?  Why do I have the factual information of each one including an actual marker in my garden?  Why do I keep historical growing records of each plant?  Why do I bring them inside in quantities when I know they will die that evening?  Why of course, “It’s one of nature’s bright treasures!”

Friday, August 21, 2020

Drought Conditions - Fall 2020

Parch - Parched - More Parched!  It's dry in some parts of the country and dangerously dry in some Western states.  Stats from the weather folks say we're in a dry period in parts of Illinois.  What's the difference from other years?

Other years, we most always have lack of rain in the fall.  The ground gets big cracks, some things wilt and others go dormant.  It's Fall in the Midwest.  Usually this period has followed a nice wet spring and most perennials are thriving off the underground reserves.  This year is different.

Although we did have spring rains, in my particular area it often went around me.  I'd get a bit of a sprinkling, usually less than half an inch, and no real soakers.  I'm glad some of those hail and wind storms went around me but the lack of moisture in the soil is now causing stress on perennials.  Perennials that are stressed in the summer will go into winter in poor shape.  

I have a drilled well that goes into a major aquifer and it would take a lot o dry out that huge underground river.  But well water is pumped by an electric pump and there is a cost to run.  There is also the time factor.

To water deep enough to really benefit perennial roots, water must be applied to the entire root system and at a depth deeper than the roots grow.  If the water is applied only minimally (shallow,) the roots will reach up for it and this weakens the plant.  It will also starve the plant of the deep moisture and nutrients within that lower level of soil.  Shallow roots on trees is the reason you see some blow over so easily.  It makes those roots more vulnerable to insects and disease which typically thrive in the few inches below ground level.  As the sun bakes the ground, it will also bake shallow roots.  In other words - water deep or don't water at all.  

No hand watering does as much good as a good rain fall.  A good steady rain over hours soaks deep into the earth and it covers all the soil to that level.  It doesn't miss the spread out roots of trees or the little sprouts hoping to become something bigger one day.  

Here is how I hand water:

If there are drought conditions or if I've transplanted or planted something new, I make sure there's a trough built out from the stem with an approximate 3-inch berm around the trough.  I then cover both the trough and berm with a good 3-inches of mulch.  Then when it rains or when I water, the moisture is funneled down into that specific root ball.  The water doesn't run or blow off.  It makes hand watering easier and less water is needed because it all goes to where it's needed.  It also doesn't coat the leaves.

The downside of hand watering is the dry soil will suck moisture out of the area you watered so it will need more watering than you suspect.

I have never used irrigation systems (simple or complex) but I know the benefits are regular watering, in specific spots and from the ground level.  The negative it can be costly and complex to install and run.

I've used sprinklers when the whole area is parched and things I love are dying but I don't recommend it unless you can afford to run it a L.O.N.G. time.  Otherwise, it will simply put moisture in the air, wet only the mulch and often cause mildew on some plant leaves.  If you feel you must use sprinklers, put out a rain gauge to measure just how much is actually landing on the ground.  At the end of the day, dig down and see how far it entered the soil.  Most people are surprised how little it helped.

Because I had a large walnut tree removed from a previously shaded bed, the hosta needed to be removed because they were burning up.  Once that was done, I moved in daylilies.  Daylilies that had been in the wrong spot in my yard and a few new ones.  This requires watering every couple of days.  I put the garden hose on a heavy concentrated spray and hit the trough.  I count slowly to fifty.  That's about a gallon per plant.  All the plants have revived and are setting new leaves and this means the roots are getting established.  

When I compare these frequently watered plants to my established daylily plants, it's a most vivid indication the established ones are suffering from drought.  Daylilies are tough plants and they will most likely all survive this summer but they are certainly stressed.  I consider my yard too large to water everything and some things will have to tough it out or die.  Hopefully the first.

There are some things you can do to help drought stressed perennials besides watering:

  • Trim off seed heads.  These suck energy from the roots.
  • Weed.  They compete for moisture and usually win.
  • Mulch:  It helps hold whatever moisture there is in the ground and insulates from the heat or drying winds.
  • Clean:  Cut out all dying leaves and flower stems or branches.  
  • Check:  Make sure insects or disease hasn't taken hold on vulnerable plants and act quickly to mitigate.
  • Pots:  Use saucers under your pots to keep a supply of water between watering.  Make sure it doesn't stand for more than two days otherwise you'll invite mosquitos.  
As a simple reminder:  If you burn yard waste, be especially careful this year.  Dry plants, evergreens, grass and maturing field crops can help spread fire quickly. You are warned!

Tuesday, May 5, 2020

“It ain’t over till it’s over.” – Yogi Berra

Original work by Jerry Sutton, Native American Cherokee

“Persistence can change failure into extraordinary achievement.”  Marv Levy

“There is a power in nature that man has ignored. And the result has been heartache and pain.” 


“Never give up, never give in, and when the upper hand is ours, may we have the ability to handle the win with the dignity that we absorbed the loss.”  Doug Williams


"A good way to start thinking about nature, talk about it. Rather talk to it, talk to the rivers, to the lakes, to the winds as to our relatives.” 
John (Fire) Lame Deer, Lame Deer, Seeker of Visions

"It's not whether you get knocked down; it's whether you get up."  Vince Lombardi


“We travel only as far and as high as our hearts will take us.” 


“A champion is someone who gets up when he can’t.”  Jack Dempsey

“As chief, I will represent my people in many different ways and might never know which particular action is destined to matter more than another, thus, all my actions should be considered potentially important and worthy of my best effort.” 
Jennifer Frick-Ruppert, Spirit Quest


“Never let your head hang down. Never give up and sit down and grieve. Find another way.”  Satchel Paige


I have a beautiful tree, the Cornus florida "Cherokee Chief" dogwood.  It'll be twenty years old next year.  It's history of survival in my garden is a good example of perseverance.  Like many of the quotes at the beginning of this article, it has not only survived but flourished. 

When planted, it did so poorly I finally moved it to a sunnier location seven years later.  Still, it didn't bloom for another three years.  Finally it would have a few blooms but they were odd shaped and the leaves continually got mildew.  Occasionally it would loose an entire branch.  I treated it, babied it, pruned, moved and lavished love.  It limped along. 

I gave up and decided to let the poor thing die on its own.  I ignored it.  Fifteen years from the year it was planted, the tree became healthy and has bloomed and gained vigor every year since.  This year it is FABULOUS.


When people ask me about problems with certain plants,  sometimes there's no good explanation nor rational cure. The Cherokee Chief dogwood is certainly a testimony of "The Little Engine That Could":  I think I can, I think I can. . . and it did.

Instead of offering advice on the care of dogwood trees (and after all my failures, who'd believe me anyhow) I'll tell about it in general.  

Cherokee Dogwood trees are hybrids and twenty years ago cost $90 - a remembrance gift from my church family at the death of my father.  It was from a good nursery.  It should have done well - but I digress.  

It's considered a small tree growing to only about 15 foot.  Perfect for town, small yards or as an accent tree.  The fall foliage is brilliant red.  It forms shiny red oval berries about 1/2 inch long.

The bark on a young tree is smooth and gray.  As it ages it becomes a grayish brown looking like alligator skin.    

It's the state tree of Virginia.  It is native to the United States and has many old uses:  
  • Handles for mallets and golf clubs
  • Red dye from the roots
  • Powdered bark for toothpaste, black ink and an aspirin like substance.  (Not sure how toothpaste and black ink go together but apparently you won't have a headache over the black teeth.)
  • Birds eat the berries and deer may eat the twigs

Biblically, the Dogwood flower is a symbol of rebirth and resurrection. This symbolic meaning was derived from the association of this flower to resurrection of Jesus Christ.

According to an old story, it was the dogwood tree that provided the wood used to build the cross on which Jesus was crucified. ... It was cursed to forever be small, so that it would never grow large enough again for its wood to be used as a cross for a crucifixion.  As legends go, the dogwood tree doesn't grow or isn't native to that area and isn't mentioned in the Bible by name.  

Dogwoods are symbols of protection and safety in southeastern Native American tribes. In some Mohawk communities, the primeval Tree of Life in the Sky World was said to be a giant dogwood tree. In Northwestern tribes such as the Quileute and Makah, the dogwood symbolized good luck and dogwood berries were eaten during religious ceremonies. Dogwood fruit was a popular food item for many Native Americans, especially the Interior Salish tribes, but to Blackfoot people, the dogwood tree was associated with masculinity and women used to refrain from eating its fruit. The bark and roots of dogwood trees were frequently used as medicinal herbs and dyes, as well. Dogwood sap, however, is toxic and was used in some tribes as poison. 


For a Cherokee Legend about dogwoods, read "Little People of the Cherokee".  It just might apply to what happened to my tree.