Wednesday, August 31, 2016

Easy Catsup

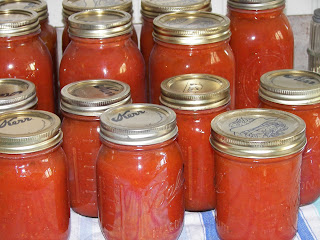
I'm not sure the modern family is prepared for homemade catsup - it's an acquired taste because of the flavor, consistency and container.  If you like the idea of knowing exactly what's in your catsup and the exciting fresh flavor, here's an easy way to prepare.

Easy Catsup

8 pounds     -     Ripe tomatoes - stem and quarter
2                 -      Ripe sweet red peppers - core & seed
2                 -      Ripe sweet green peppers - core & seed
4 medium   -      Onions - peel and quarter
3 cups         -      Vinegar
3 cups         -       Sugar
3 Tblsp.      -       Salt
1 1/2 tsp.    -       Allspice
3 tsp.          -       Dry mustard
1 1/2 tsp.    -       Whole cloves
1 1/2 tsp.    -       Whole cinnamon - break into a few pieces
1/2 tsp.       -        Hot red pepper

All vegetables should be washed and stems removed.  Cut peppers into strips.  

Spray my cooking container with PAM cooking spray.  

Put vegetables in blender container (or food processor) in batches.  Blend at high speed for 4 seconds, pour into cooking container.  

Add vinegar, sugar, salt and stir.  Tie the spices loosely in a thin muslin spice bag and add. 

Simmer in a large oven roaster at 325 degrees.  Cook until volume is reduced one half.  Remove spice bag.  

Immediately ladle into hot sterilized jars, seal and process for 15 minutes.  Makes 5 pints.  

Good General Information

Blending and cooking in the oven eliminates a lot of work.  You don't have to use the food mill to process out the "chunks" and you won't have to stir to keep from sticking to the pan as you do with stove top cooked catsup.

If the reduced consistency isn't as smooth as you prefer, let the mixture cool a bit and run it again through the blender/food processor, return to boiling (stir to keep from sticking) and then can.  Don't put hot foods in a blender as it will explode and burn you and make a huge mess.  Plus, it's hard on the plastic.  Re-blending does add more time and clean up to the process.  

Once it's opened, home canned catsup will not keep in the refrigerator indefinitely the way store bought catsup does.  Unless your family uses catsup really fast, I'd recommend canning in 1/2 pint jars.  

Tomato Juice Cocktail

I drink a lot of V-8 type tomato vegetable juice, especially in the winter.  I like the taste and it adds nutrients to winter meals and snacks.  It makes a good salad dressing if you're cutting out fat and preservatives.  


Tomato Cocktail Juice

6 pounds     -     Tomatoes - cored
1 large         -     Onion - peeled cut in quarters
2 stalks        -     Celery - cut into 1 inch pieces
2 large         -     Carrots - topped and cut into 1 inch pieces
1                  -     Bell pepper - cored and seeded
1                  -     Hot pepper - cored and seeded (optional) **

Cook until all vegetables are thoroughly soft.  Run through food mill to squeeze all juice from mixture.  Discard solids to composter.  Return liquid to pan.

Add seasonings:

1 tsp.          -       Prepared horseradish
3 Tblsp.      -       Fresh lemon juice
1/8 tsp.       -       Worcestershire sauce
1 Tblsp.      -       Ground pepper
To taste       -       Kosher Salt

Cook, stir to keep from sticking, until boiling.  Ladle into sterilized jars, cap and process for 15 minutes.  This will make 2-3 quarts.  

Good General Information

You may want to experiment with the added seasonings to get it to your taste.  You can leave out all seasonings and add when serving to taste.  

**Fresh hot peppers usually increase in heat during the canning process so experiment in a small batch so you don't make a lot that no one can drink.  I've found hot/spicy canned vegetables may loose some of the hotness over time sitting in storage.

For the Bloody Mary fans:  If you put these in pint jars, they make nice presents.  You could include an individual bottle of vodka, a cocktail glass and seasoned salt for the rim.  Wrap each in bubble wrap and then gift wrap.


Tuesday, August 30, 2016

Tomato Preserves

Picture taken from Pinterest
I raise both red and yellow tomatoes.  This is the perfect recipe to make a batch using each and you will have beautiful jewel toned preserves.


Tomato Preserves

1 pound     -    Tomatoes (firm and ripe)
1/2             -    Lemon - thinly sliced
3/4 Cup     -    Water
1 2/3 Cup  -    Sugar

Core and then dip tomatoes in boiling water, then cold water to remove skins.  Cut in quarters.

Boil lemon slices and 1/4 cup water 5 minutes.

Heat 1/2 cup water and sugar; simmer 5 minutes to make a syrup.

Combine sugar syrup, tomatoes, lemon slices and lemon liquid and boil until tomatoes are clear and syrup thickens slightly.  Stir to keep from sticking.  Skim foam off and discard.  Consistency will vary depending on variety of tomato.  

Ladle into hot jars; seal.  Process for 15 minutes.  Makes 2-3 half pints.  


Good General Information   

Preserves are not as thick as jelly which makes it good to serve as a condiment for meat or as the base for bruschetta.

There are literally thousands of recipes for preserving tomatoes on the internet.  Many look fabulous.  If I haven't used a recipe before, I usually only make a small quantity to make sure we like everything about the taste and looks.

ALWAYS taste your finished product before canning.  It's the time to adjust seasonings or if it's a total bad news bust, compost before you waste any more time and resources processing.

No matter what a new recipe says, ALWAYS & ALWAYS follow good canning practices.  That includes cleanliness, cook times, processing times and ingredient quantities.      

Sunday, August 28, 2016

Tomato Relish

If you have a lot of tomato plants, you may find yourself with tomatoes that are beginning to split from so much rain.  They split because the rain causes the inside to swell from all the moisture and the skin is too small.  Once they split, they must be harvested immediately or insects will invade and it's all downhill from there.  I'm going to post some different recipes for using those extra quantities of tomatoes.


Tomato Relish

8 quarts      -     Ripe tomatoes - cored and peeled
6 Large      -     Onions - peeled
4                       Sweet green peppers - cored and seeded
2 Cups       -      Celery 
4 Cups       -      Brown sugar
1/3 Cup      -      Salt
4 Tblsp.      -     Mustard seeds
3 1/2 Tblsp. -    Cinnamon - ground

Coarsely chop tomatoes and put into large heavy pot.  (I spray my pot first with PAN cooking spray or use olive oil.)

Coarsely chop other vegetables with the coarse knife of the food chopper or food processor or by hand.  It will look prettier if these are all similar in size but makes no difference in taste.

Combine all ingredients and cook slowly, stirring to keep from sticking, about two hours or until the mixture is thick and clear.

Ladle into hot, sterilized jars; cap and process for 15 minutes.   Makes about 14 pints. 

This thick sweet relish is good with meat or cheese.  Makes a good condiment for sandwiches.

Good General Information


Fresh tomatoes  =  canned tomatoes:

Bushel  =  20 quarts chopped 
Bushel  =  12 - 16 quarts juice
2 1/2 - 3 1/2 pounds  =  1 quart

From "Freezing & Canning Cookbook" by the Farm Journal 1963 collection of "Prized Recipes from the Farms of America."


Saturday, August 27, 2016

For Sale By Owner


No I'm not all about advertising places for sale on here but thought you might be interested in this beauty:

The Altona, Illinois, Amber Jar Antique Co., 101 N. Depot St. is for sale by owner.  I didn't ask Sue what they want for it or any of the particulars - you would need to call or visit for those.  

This was from the Village's "for sale or rent" web site:  

"The Village Store was built by Cyrus Willard and J.S. Chamber in 1853.  The store was the first building erected in Altona, and was the only store between Galesburg and Kewanee.  This store is still in operation today under the name of Amber Jar Antiques."

There was an article in the Galesburg Registered Mail when the building was renovated for the antique shop but I wasn't able to find the link.

Just from my visiting the store:  They use the main floor of both the two story and one story buildings for the shop (connected by a door.)  There is a small lavatory and a small kitchenette at the back of the main floor.  No idea what's on the second floor or if there's a basement.  It appears in good shape and maintained.  Sue did tell me she currently had some people looking but no one has cinched a deal.   They have a Facebook page if you'd like to see more:  https://www.facebook.com/Amber-Jar-Antiques-Co-117454638286351/?fref=ts  


There are at least three antique shops in Altona, making it a bit of a antiquing destination.  Walnut Creek Mercantile, 115 S. Depot.  (Primitive and handmade items) is a nice shop.

  The old shop at 101 S. Depot is for sale but might be in disrepair if I've understood the village council minutes correctly.  Not sure if it's ever actually open for business anymore although the sign indicates it is.  

Thursday, August 25, 2016

Problem Solving 101


Sometimes it’s difficult to find a good solution to a garden problem.  Since fall is the time we plant many perennial bulbs, I thought I’d share some good common sense protections and solutions I’ve gathered from reliable sources:

For most every fall planted bulb:

·      Seldom will a bulb survive if they stand in water.
·      Fertilize with one tablespoon bulb fertilizer (slow release 10-10-10).  Do NOT use manure.
·      After bloom, allow foliage to yellow completely – it provides the nutrients for next year’s flowers.
·      Because the foliage disappears over the summer, sprinkle colored fish tank rocks around them and you won’t be digging them up or damaging later.  Trust me:  You will forget where they’re planted.
·      You MUST plant at the right depth and in the right position.
·      If you naturalize bulbs in your lawn, don’t mow until the foliage turns yellow.

Protecting bulbs from animals:

·      If animals dig your newly-planted bulbs try covering with plastic bird-netting, wire-mesh, a window screen, or burlap bags for a couple of weeks till the inviting smell of freshly-dug earth disappears.
·      If animals burrow to your bulbs, try lining the planting hole with wire-mesh, plant in wire-mesh boxes, or plant in buried pots covered with a square of chicken-wire.
·      Moles often disturb bulbs as they dig for grubs. Killing the grubs will also discourage voles and mice which often use mole tunnels to munch on bulbs.
·      If animals eat spring growth, cover it with chicken wire for a few weeks (while they are hungriest), sprinkle blood meal around it, fence them out, or spray it with bitter, non-toxic Ro-pel, available at many garden centers. Bulbs can be dipped in Ro-pel before planting, too.


Getting the most and longest lived results from tulips:

·      Plant where you never water in the summer or where some large tree or bush will drink the most. 
·      Tulips need lots of sun. 
·      Plant in mid to late fall after the soil has cooled.  Later is better. 

Knowing your daffodil:

·      Plant in full sun although they adapt to light shade. 
·      Plant in mid-fall when soil cools; earlier is better than later. 
·      Avoid or improve clay soil.
·      Re-fertilize lightly every spring and fall.
·      Deer, rodents and most other pests leave daffodils alone. 
·      If they decrease in numbers, it usually means overcrowding – dig and divide.

The indestructible crocus:

·      Plant as soon as the soil cools in the fall to give them time to establish roots.
·      Plant in full sun to very light shade.
·      Do not apply a thick mulch; they are too small to push through.

The wonderfully scented hyacinths:

·      Hyacinths like rich, well drained soil that’s dry in summer and in full sun.
·      They should be well-mulched in our zone 5 to survive our winters.
·      Some people are allergic to hyacinth bulbs – if you are – use gloves to plant.
·      Plant mid-fall.
·      To prevent large varieties from flopping, plant a thin green bamboo stake right next to the bulb and the florets will clasp the stake.  

The wonder of Peonies:

·      Plant in EARLY fall to give the roots a chance to put out feeder roots before it freezes. 
·      Choose a sunny to lightly shaded area with good air circulation and plenty of room for growth.
·      They do best in somewhat heavier clay soils away from roots of trees & bushes.
·      Plant shallow – deep planting leads to poor or no flowers.
·      Apply a winter mulch after the ground freezes on new plants.  Use straw, cornstalks or evergreen boughs – do not use leaves.
·      Although the bulbs will rot if they stand in water, they need good moisture.
·      Blooms will be meager the first few years while it establishes strong roots.
·      After the leaves turn brown in the fall, cut all foliage back to ground.
·      Peonies generally DO NOT need fertilizer or they won’t bloom well.


Other beauties:

Many woodland plants benefit from fall planting.  Try some of the old favorites such as bluebells, Anemones, Jack-in-the-Pulpit, Fritillary, Snowdrops, Squill or Trilliums.  Each have their own set of instruction.

“Old House Gardens” has wonderful instruction, history and fun facts.  I use them for all these. 

Fall is the perfect time for planting many of these wonderful long lasting perennials.  It isn’t instant gratification, but come next spring you’ll be glad for every single one!

Went to the Danger Zone

American Robin babies
Earlier this summer I posted a picture of the misguided mother American Robin who had built a nest in the cedar tree near our door.  Not only near the door but over the sidewalk, close to where the cats roamed, head high, close to the kiddy pool and altogether in a very dangerous place to raise little ones.

Although she would fly away and chatter at us if there was too much activity, she managed to raise two little babies to adulthood.  All three eventually left for life on the wing.  It was happy ever after in spite of my misgivings.

Mother Mourning Dove
About a week later, a mother Mourning Dove built a nest about a foot from the old robin's nest.  Seriously birds let's get a grip!  We live in the country where there is lots of room and trees and you two make your nests in the most traveled area around our home.  

On top of that, Dove nests are a few grasses and sticks laid down flat without the benefit of the robin's sturdy large cupped nest.  For better or worse, the Dove isn't concerned and never leaves her nest out of fear.  She will watch us but that's about the extent of her caution.  Here's hoping for continued success in our danger zone.

On other nesting news:

  • We have Gray Catbirds nesting in the large batch of Zebra Grass.
  • Northern Cardinals nesting in the arborvitae and in the briars in the woods.  
  • Brown Thrashers in the evergreen wind break.
  • House Wrens are through with their parenthood for the summer and are off chattering to others.
  • Ruby-throated Hummingbirds in some secret location I've not detected.
  • Great Horned Owls in the woods.
  • Orchard Orioles tend to stay near my huge trumpet vine.
  • An array of sparrows, finches and other beauties.  

There's been very little bird killing by predators but living on the wild side of nature is always in the danger zone.

Monday, August 22, 2016

The Power of the Flash

Cleome's little details highlighted with dark background.
If you love taking pictures of your gardens, then I have a deal for you!

Go outside near dusk (that would be when the sun has set but you can still see to walk around) with your camera on flash.  You may also want to use bug spray because that's prime time for biting insects.

Annual grass that only looks totally red in the sun.
The main reason to do this, is at this time of day, the flash will spotlight the object and the background will be dark.  An example is the cleome picture (above) I did the other evening.
Yarrow heads are made up of tiny flowers.  
It's hard to capture tiny flowers in full sun.  With a flash and dark background, it highlights them.
Hosta "Prairie Dazzler" was hybridized for it's gold crepe leaves.
Leaves may not show details unless highlighted by the flash.  This hosta is a good example of highlighting the very details that make it different.

Another reason is it will show the actual color and details of the items much better than when it's only accented with the sun.  The sun can distort color or have it so bright the details are fuzzy.
Donkey Tail Spurge with a drop of rain.
By eliminating or fuzzing the background, the item is totally spotlighted.  Backgrounds can be distracting.  During late summer, some foliage is beginning to look pretty ragged and this eliminates those less than pretty backgrounds.
This big boy was very happy to have his picture taken and
even had a drop of rain on his wing.
Most of us think of night insects in terms of pests but there's a boat load of interesting things flying about at night - some pretty amazing moths and the occasional bat will make a great picture.

Maple leaves showing Chlorosis.
If you have a plant where you need to identify a problem, this is the perfect time to get a picture showing exactly how it looks.  This picture of my maple shows "chlorosis" extremely well and helped to identify that problem.  Not that it made it any more fun but it allows earlier treatment when you can figure it out right away.

The wind often dies down at dusk and this will allow for fewer fuzzy pictures brought on by movement.

Western sky in late fall.
It's a time of the early evening when clouds are often moody and silhouetting is easier.

Getting close ups of things is always a bit tricky in full sun.  With a flash and photo cropping, it can give you some super natural and abstract looking pictures.  Let your inner artist shine!

If you're a picture taking gardener like me, click on the top picture and look at them in a larger format.  Now outside to weed - the daily task all gardeners in this area have had this summer.  


Saturday, August 13, 2016

Etc. Etc. and Etc.

Gardeners and Pinterest go together like a love and marriage - on days when you're not actually in your gardens - or - putting up produce you picked from your gardens - or - looking at garden catalogs - or - in a nursery and garden stores - or - touring another person's garden - or - etc. etc. and etc.

Pinterest can be a colossal time eater  - or - it can give you ideas.  I have my  "- or -" fingers going today!

The trick on Pinterest is to stay focused and if you have even a little bit of attention issues that can be difficult.  The "OH LOOK IT SPARKLES!" can transfer over into "OH LOOK AT THAT FLOWER!"

Unless you're up at 3 am and can't go back to sleep, making a plan of what you want to see on Pinterest before you enter the site helps with the focusing.  Today I wanted to see old tree stumps made into flower pots.  I found quite a few beauties:  


All of these are from Pinterest.  I've tried to show stumps that are still in the ground and not just cut logs.  BUT you could look at whatever tickles your fancy.

Most stumps made into flower pots won't last a lifetime because eventually they will rot and fall apart.  Essentially if a tree has been taken down (or came down) it had health issues.  Granted a few were taken down because of other reasons but most have part of the middle gone.  And that's where the pot of flowers will go.  
My new stump fairy garden house aka the old walnut
My first stump flower pot was an old hallow maple we took down in the front yard.  It last two years but was so lovely for those two years.

Unless the tree is taken down because it's totally in the way, and then we cut it down to ground level, I leave some portion of the tree to do "something" with later.  I've used them for a flower pot, fairy garden house, bottle tree, to top with a bird house or bird feeder and etc. etc. and etc.

Using tree stumps for any of the above and more is a mind shift for most foresters and non-gardening spouses, "Get it gone and get it cleaned up!"  It took a bit of convincing in the beginning but now it's down to simple eye rolls.

There's a tall tree stump at our local motel and I would love to put bird houses on each little branch stump - it needs them!  But, perhaps they need to do their own Pinterest searching etc. etc. and etc.


Thursday, August 11, 2016

Chick Magnet


Oh Yes!  I have chick magnets right here in my gardens.  Some rather wonderful chicks and I have to admit; a few fellows are drawn to my gardens by some rather ordinary flowers.

Late summer and early fall is the time when we see big wonderful butterflies lapping up nectar.  Although you may have other attractions, I have one they favor and then a wealth of others they visit daily.


Butterflies love phlox.  Old garden phlox isn’t at its most beautiful mid-summer because it tends to get mildew, lose leaves and look messy.  They flop and sometimes crowd out more well behaved plants.  But “Katie Bar the Door” – in August they attract the large butterflies - the swallowtails.  Swallowtails love phlox so much they don’t even notice me taking their picture or kids screaming in excitement.

Don’t get me wrong, I love the little butterflies and the less distinctive ones but for a real show, it’s swallowtails.  They lazily soar and flit from flower to flower sometimes over the house from front to back.

There are more than 600 species of swallowtails worldwide; fewer than 30 in North America.  Fewer still in our area.  Most fall into four general subgroups:
 

  • ·      Black swallowtails are black with yellow spots or bands.  The caterpillars usually feed on the carrot family.
  • ·      Giant swallowtails are dark brown and yellow and their caterpillars favor citrus plants.
  • ·      Tiger swallowtails are generally yellow with black stripes and like deciduous trees. 
  • ·      Pipevine swallowtails are blackish and their caterpillars eat aristolochias vines.      

If you want butterflies, you have to fill their needs during their entire life cycle.  And you can’t use insecticides.

Plant some of the following in your gardens and yard and do it in mass.  Butterflies will be drawn to large areas of like flowers.  I have large areas of phlox in most of my sun gardens.
Plant annuals such as zinnia, sunflowers and cleome.  Perennials such as bee balm, globe thistle, butterfly bush, Queen Ann’s lace (carrot family), Hosta, honeysuckle and milkweed.  Wild flowers and herbs such as cow parsnip, rue, parsley and fennel.

Provide a little shade protection, a nice rock for sunning and a water source.  Butterflies like a saucer filled with sand and kept wet.

And now to the wow factor:  Most everything you do for butterflies also benefits bees, moths and other beneficial insects and birds (including hummingbirds.)  Make your yard and gardens chick magnets!
  

Friday, August 5, 2016

Oldies But Goodies

I'm not talking about myself (this is where we all smile) rather old utensils or tools.  Some are still great for their original purpose while others are great for new tasks.

Why would anyone use something old when you can purchase most anything at your local big box store?  You did ask that didn't you???

I still use kitchen utensils from when I first had a home of my own (over fifty years ago.) Plus, I've acquired quite a few utensils and tools from my parents' homes, both their own and some handed down from my grandparents.  

Mom and Dad came from the Depression era and learned to care for their things because they might not be able to afford another.  Yes, they were the "waste not - want not" generation.  Here are a few of the oldies but goodies and how I use them today:
This is a "Kitchamjig" and every kitchen should have it for getting solid things out of liquid: teabags out of a pitcher of tea, a roast out of the gravy and etc.  The old wooden handled ones are about $20 on e-bay.  New ones are plastic and/or aluminum.  Whatever the material, you don't want one that will melt.  

This is one of my favorite garden tools - a putty knife.  It's old
and sturdy, has taken many sharpening and is perfect for
digging up weeds.  Obviously, there are new ones but this old
variety has been long lasting and comfortable to hold.
Every kitchen should have an egg chopper.  This makes the task  (for egg salad, etc.) fast and perfect.  I don't know of any new models that come close to this functional.


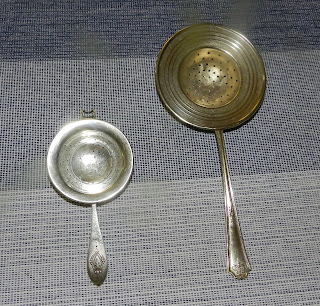
These strainers are mostly for loose leaf tea.  The top three are more utilitarian.  The bottom two are from silver sets.  The middle strainer is perfect for straining out seeds and herbs when pouring liquid into canning jars.  All of these are old and pretty darn sweet.

What do the old utensils and tools have in common?  They all need to be cleaned right after they're used and thoroughly dried.  The bottom silver pieces need to be polished occasionally.   If the metal ones start to rust, they need to be buffed with steel wool or one of those sponge scrubbers and then oiled.  I use olive oil because it's handy, safe around food products and doesn't stain my counters.  For garden tools, you could use an oil specific for tools.

What's some of your favorite "oldies but goody" tools and utensils?  
Do you use them or are they memories revisited?   This little collection I don't use but they are from my mother's kitchen.  They all work well and I still maintain them - just because they're her oldies but goodies.